Saturday, January 29, 2011

Let them eat cake

My friend's little girl, Makenna, turned three recently, and she asked me to help her with the decorations for the party.  Makenna is as girlie as they come, so it's no surprise that the color scheme for the party would involve the color pink.  Far be it from me to argue with a three year old little girl.  Besides, pink is probably my one of my favorite colors, so I love to get some pink in when I can.  I threw some ideas out to my friend.  She loved them and basically let me loose.

I invited a friend over to come help since I wasn't exactly sure my ideas would work. My friend Mandy is pretty much the only friend I have that I can say, "Um, I've got an idea of what I want to make but it's probably going to take hours and hours to make, and it might not even work because it's just an idea in my head. Wanna help me?" And she'll jump right in, no questions asked. So when I asked her she said, "I can only come Monday, Wednesday and Friday." Awesome.

This is the invitation to Makenna's birthday party as shown on Tiny Prints.   

{image via Tiny Prints}
Cute, eh?  If you aren't familiar with Tiny Prints, they are pretty awesome.  It's hard to justify making invitations when there are invites that cute out there.  And very affordable. 

The stipulations for the party were that balloons are not allowed and that it had to be set up and torn down within 30 minutes since parties were scheduled back to back.  What that in mind, here's the decorations I made.


For the centerpieces, I took the invitation literally and we made cakes using cardboard, toothpicks, and paper.  I used my Silhouette to cut out little flames for the candles and attached those to the candles with floral wire. 


Here's all six of them.  I alternated between light pink and dark pink since the invite had two shades of pink.  I also tried to match the candles to the invite. 


Here's the cakes in action with the rest of the decor.  I kind of wished this was my party, only somehow I don't think 33 candles on each cake would have looked quite as cute. 


And another shot of the party area.  Mandy and I cut wrapping paper to make table runners to lay over the table for all the cafe tables  -- something I love to do for parties because it is very inexpensive and always adds a huge pop of color -- and then punched a million circles out of cardstock and scattered them on the runners to create polka dots.  Have I ever told you about my obsession with polka dots?  I can't get enough.  It's funny.  My twin sister has a thing for stripes.  For me, it's always been polka dots.  They complete me. 


For the tables that did not have cakes on them (my friend wasn't sure how many tables there would be), I used my Silhouette to cut out large M's and we glued those down to large circles.  It took probably 10 minutes to set everything up and about 5 minutes to pack it all up with some time to spare for the next party.     

And I can't leave you without showing you the cake.  My friend had it made.  And I think it was perfect


The real cake couldn't have been any cuter.  Love.It.

I think the biggest compliment I got was from Miss Makenna herself.  She was playing with one of the paper cakes and my friend asked her, "Do you like it?" Makenna replied, "I like it.  It's pretty."  My heart melted.

Happy Birthday, Makenna!   Thank you for allowing me to be apart of your life.  I look forward to getting to know you as you grow into strong, beautiful woman.  A woman that will hopefully love to craft.  Know that you are loved.  By so many people.  Eat your cake now, Makenna.  Because all too soon you will start thinking about how many calories it has in it.  :)

Thursday, January 20, 2011

Carried Away

Here's a little project I've had in my head for a while. Anna Marie Horner has a fab tutorial on tote-able towels on her blog.  Since I'm not really a beach towel kind of person, I just made a mental note of it as a possible gift when my friends' kids get older.  But, the other day as I was walking into yoga carrying my purse, my water, my mat, my towels, and a bag of my clothes, I thought I should probably invest in some sort of carrier for my yoga mat to free my hands up a bit so that I can pick up my water, my towels or my clothes when I drop them.  Because I am always dropping something.  I don't like traditional gym bags and prefer something cute and, well, non-traditional.  So I thought I'd just make one.

I wanted something simple in design, quick to sew, and something that could easily be folded up and tossed into one locker along with all of my other things.  I was also wanting something flexible so that I would not have to worry about how tightly I wrap up my mat. One day, as I was rolling out my mat, Anna's tutorial came to mind.  So, I thought I'd modify it a bit to carry my yoga mat.  Here's what I did for Version 1.0.


I cut one piece of linen and one piece of interfacing to 16"x12" and then a second piece of linen down to 15"x12".  The 12" width is the portion that will wrap around the rolled mat.  I then pressed the linen.  I know some people are opposed to using interfacing, but with this project the fabric needed some weight to it for it to lay properly. And I had some in my stash from some project that I never started so I was glad to use it up. 

To add some color, I cut a 4" wide piece of printed fabric down the width of the fabric. My printed fabric measured 44" wide. This would be used for straps and the outside of the carrier. I simply chose linen because I scored about 3 yards of it on clearance at a fabric store that was closing.  But I also love the look of linen when it is paired with another fabric.  I just feel like it makes the printed fabric pop so much more - a concept I got from a fellow sewer friend.  


To create a decorative outside layer, I cut 12" off the length of the printed fabric and then cut the 12"x15" piece of linen in half to get two 7.5"x12" pieces.  I sewed the three pieces together using a1/4" seam and pressed the seams open. 

For the straps, I followed Anna's directions and pressed the printed fabric in half lengthwise and then folded the edges toward the center crease and pressed again.  So, the strap is 4 layers of fabric and an inch wide.  I top stitched it 1/4" from the open edge to close it up and pressed again. I am a big believer in pressing, if you can't tell by now.  Once I was finished, I cut 9" from the length to create one long strap and one short one.


I ironed the interfacing onto the wrong side of the fabric then pinned the straps to the right side of the fabric equidistant from the edge of the 16"x12" fabric, making sure my straps were going to lay properly and not end up twisted.  It came out to be about 5" between each strap end.  At this time, I trimmed the decorative layer down to 16"x12". You could also do the math and measure exactly how much linen you need for the decorative layer, but I am too lazy for that.  So, I trimmed mine down to 16"x12".

All of the layers were then pinned together and sewn together using a 1/2" seam.  I left a 3" opening on one side to pull the fabric right side out. I made sure to backstitch several times on the straps to secure them. 


I then clipped the corners and pressed the seams open.  You could probably trim the edges at this point, but I left mine there.


Once I was finished, I blind stitched the opening to close it up and pressed the entire thing one last time.


Here is the final product!  I am debating whether to add a top stitch to it for an extra cuteness factor, but it's pretty cute without it.

To use it, just pull the longer strap through the shorter strap, and....


Voila!  It's a yoga mat carrier!!  It took me 2 hours from start to finish, including water breaks, taking pictures and a seam ripping for a dumb mistake I will not mention. I have a reputation to uphold, after all.


Here's a close up. I love it. Yes, it is basically a glorified placemat.  But, it is one less thing I have to hold and it's pretty darn cute, if I do say so myself. There are so many ways to modify this pattern.  Trust me, I've already got a few ideas how to improve it and make it more functional and even cuter.  But for now, I am happy. 

Thursday, January 13, 2011

January Obsessions.

Still no crafting for 2011, but here's my January Obsessions.  With the holidays just a couple of weeks behind me, I really don't have much I have been obsessing over.  But, you know me.  I need just 20 seconds in a hardware store and could give you 20 things I want.  So here we go!
{image via Estee Lauder}
Estee Lauder's Sumptuous Mascara.  I am forever trying to find the perfect mascara. Mascara is one of life's necessities for me.  I rarely do without.  My friend always gives me her free Estee Lauder samples so I get to try out different mascaras when I get lazy and run out before buying a new tube - which is how I discovered this mascara.  From the first use to the last, it keeps my eyelashes looking really...well, sumptuous.  Love.It.


Glen Hansard's Say It To Me Now.  I know I am totally behind on this one, but you can't deny it's an amazing song.  And, well, Glen Hansard is amazing.  I finally caught Once over the weekend after many, many attempts thanks to Anita + Apple TV + Netflix (a life changing combination I might add).  I've heard so much about the soundtrack to Once that I purposely waited to see the movie before listening to it.  Now that I have seen the movie, I am addicted to Glen Hansard.  Especially to this song.  If by chance you are one of the few people in the world that hasn't seen Once, you can check out the entire soundtrack here.

{Image via Two Peas in a Bucket}

Basic Grey Micro Mono Stickers.  I love these stickers.  I've used them on several cards and can't get enough.  They are such a perfect size for cards and smaller projects and come in so many different colors.  Apparently, I am not the only one that thinks so.  They are never in stock!!  

{image via Amazon}
Soundtrack from An EducationLike I said, I got a chance to catch up on some movies last weekend that I've been meaning to watch.  For a long time. So please forgive me for bringing up old stuff here, but I absolutely loved the music in this movie. It's got an eclectic mix of artists including Duffy, Melody Gardot, and Madeleine Peyroux, which happen to be three of my favorite ladies.  The movie itself had me wanting to transport myself back into the 60's so I could wear all of those fabulous clothes.  I die.

Julie Chen, Book Artist.  I recently got to watch PBS's TV Series Craft in America. The series explores different crafts, artists and their techniques. And it is truly fascinating.  In the "Orgins" episode, Julie Chen's amazing work is introduced.  She is a book artist and she is spectacular.  Love her concepts and clean lines.  Check out her portfolio here

This weekend is already looking to be busy but I've got a project I'm trying to work out in my head that I hope to get to tonight.  Wish me luck!

Monday, January 10, 2011

Sorry...

Sorry I haven't posted in a while.  I haven't stepped one foot into my craft room since New Year's Eve.  I planned to work on a couple of things this past weekend, but I got caught up on some general laziness. And some movies. Mr. Bean left Freddie and I for another love.  Electronics.  He went to CES in Las Vegas for the weekend and I don't know that even our wedding day compared.  He was basically in heaven all weekend.  So, basically I got a chance to catch up on some good movie-watching and some not-cooking and some not-cleaning.  I don't get a chance to watch them as often as I'd like, so I basically watched 5 movies (seriously) not including the ones my mother watched while I napped.  Yeah, so Mr. Bean wasn't the only one in heaven.  I've got a ton of stuff to clean up, put up, work on, shop for and finish. Some fun and some not so fun.  I'll post about the fun stuff soon.  Until then! 

Monday, January 3, 2011

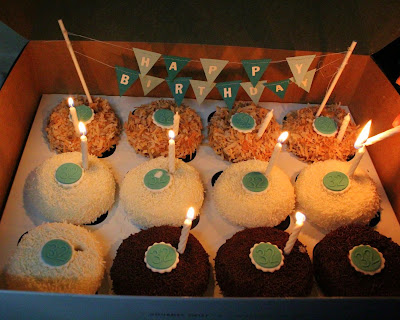
Cupcakes Need Banners, Too

Happy New Year!!!  I hope everyone enjoyed their holidays!  While I am sad the holidays flew by so quickly, I am glad they are over.  I think this holiday season I slept less than when I was in college cramming for finals.

Since Mr. Bean's birthday is on New Year's day, I tend to slack off in the party throwing department.  He likes to just sleep in and veg out and I don't argue. Usually we are out late with family the night before, so when the clock strikes midnight we all wish each other well for the new year and then we always sing Happy Birthday for Mr. Bean.  I usually have a cake - if the host doesn't already have one for him - but this year I bought his favorite cupcakes for the party.  Since I was already slacking off in the party department and the gift department - he wanted to go skiing for his birthday, so his present is our airfare - not to mention slacking in the baking department, I decided to dress up the cupcakes a bit more and make him a banner for his cupcakes.  Because banners make everything cuter. 

I cut scraps of paper and sewed them together exactly like this card.  But for some reason my sewing machine didn't like these pennants as much, so it didn't come out as well. Last time I didn't have any problems and I am not sure why I did this time.  But I am pretty sure it has something to do with the machine and not the highly skilled operator.   


Anyway, I attached the ends to some lollipop sticks with glue dots and knotted them in place.  I used Basic Grey's Micro Mono Stickers to spell out 'Happy Birthday'.  The Basic Grey stickers are an awesome size for cards and projects like this one.  My only complaint is that they only provide two capital Y's.  So one 'Happy Birthday' and you are done with the sheet.   


Here are the cupcakes in action.  Oh, and yes, when I ordered the cupcakes, I kept in mind the paper I wanted to use for the banner so it would coordinate.  Because that's how I craft.  

I think it's safe to say Mr. Bean and I started the year off with a bang.  We went to an uncle's house for a family party.  Don't let the words "family party" fool you, though. Mr. Bean's family knows how to party.  We didn't get home until almost 6:00 in the morning.  I didn't get into bed until after 7:00 since Freddie needed some TLC with the backyard.  Luckily, Billy Bean was there to keep me company every step of the way or else I probably would have fallen asleep on the floor by the back door waiting on Freddie.  I didn't even dance that much, but I woke up at 3:00 in the afternoon feeling every bit my age.  Good times.

I have some good stuff planned for 2011!  I hope you guys do too!  Please leave a comment or email me and share it with me!  I'd love to post of pics of it all here so that this is less an all-about-me spot and more about crafting a cuter world.

Huge thanks to Prithwi for taking these pictures of the cupcakes for me.  Sometimes an iPhone just doesn't cut it.

Sunday, January 2, 2011